About Faces
“Faces” is a simple block designed to give educators an overview of the faces and names of users who are currently enrolled in their course. A simple printer-friendly version of the list can be printed for daily class use and in course exam board meetings where it can be difficult to remember all the faces and names!
Development of this block is currently ongoing, so please feel free to make any suggestions.
Where Do The Faces Come From?
As this tool uses user pictures that have been uploaded by each user. It is important that each user has uploaded an up to date picture of themselves to their LMS user account. If not, all you will see is the default LMS silhouette of a user!
Adding Faces to Your Course
LMS Faces is a simple solution that allows you to view all of your users’ faces quickly and easily on a single page.
The only requirement for LMS faces to work on your course page is that each user on your course has an up to date LMS profile picture uploaded that will be used by the block.
This next section outlines the steps needed to add this block and start viewing faces!
Step 1
Log into LMS and head to your course page. On the top right-hand corner of your course page click “Turn Editing On”.
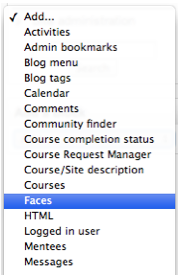
Step 2
From the “Add a Block” menu, you will see a list of blocks that can be added to your course page.
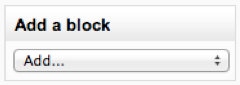
From this menu select the “Faces” block.
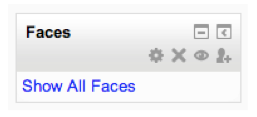
Step 3
An instance of the “Faces” block will now be added to your course page and is ready to go!
To get started with the faces block, simply click “Show All Faces” and you will see a list of all the users in your class.
Step 4 – Ordering
When opened you will see a list of the users in your course, however, depending on the task at hand, you may want to view the list in a different order.
On the top right-hand corner, a drop-down box allows the order of the faces to be displayed using their first name or last name as the ordering criteria.
To apply the selected filter simply click “Update” to the top right-hand corner after you have made your selection.
Step 5 – Filtering by User Groups
LMS offers educators the option to sort the users that have been added to LMS based upon defined groups that have been created on the course. E.g. Group 1, Group 2 etc.
These groups can be used within the faces block to filter the faces that appear on the page.
By selecting “Show all Faces”, every user will be shown. Or alternatively depending on the names that you added for additional groups, these group names would show up in the Filter drop-down menu allowing you to select only a specific group of users to view.
Step 6 – Printing
If you would like a hard copy of the user face list to be printed, without the added headings added by LMS, the “Print Faces” button can be clicked to generate a trimmed down version of the faces list. This option will consume less ink when printed.
Hiding The Faces Block From Users
If you would like to hide the block from users:
1. Enter into editing mode on your course page
2. On the top right-hand corner of the faces block, click the icon that looks like a man
3. The page will say you cannot define roles, but this is ok. On the left-hand side, you will see the “Administration” block. Inside this click “Permissions”
4. Beside “View” you will see the Roles that currently have Viewing capabilities, remove the users by clicking the X next to the role and ensure it is only set to Teacher if that is the role you
only want to be able to see the block.
Your student users should not be able to see the block!