- Workshop quick guide
- Workshop settings
- Using Workshop
- Grading strategies
- Workshop FAQ
Contents
4.1 Instructions for submission
5.1 Instructions for assessment
10 Restrict access/Activity completion
11 Click Save and Display to access further settings
15.1 Grading evaluation settings
15.2.2 Clear all aggregated grades
16 Site administration settings
Adding a new workshop
- With the editing turned on, in the section you wish to add your workshop, click the “Add an activity or resource” link (or, if not present, the “Add an activity” drop-down menu) and choose Workshop.
- On the next screen, in the General section, give the workshop a name and a description which explains to the users what the workshop will be about. You can display this description by ticking the checkbox
- All settings may be expanded by clicking the “Expand all” link top right
Description
This displays for users on the Workshop’s summary page just under the Planner. You can use it to give a brief orientation to the activity (instructions for each phase come later).
Grading settings
Grading Strategy
What you choose here determines the assessment form users will use and also the strategy for grading submissions. For more detailed descriptions see Grading Strategies. Note: Grading strategies can’t be changed once we have entered the submission phase of a workshop
- Accumulative grading: Each assessment criterion has its own numeric grade along with optional weighting and optional comments; a final grade is calculated on the basis of the separate grades and their respective weightings.
- Comments: No numeric grade but feedback only, as comments either in a single field or as responses to a series of guiding questions.
- Number of Errors: Markers decide whether the work has passed or failed each criterion (e.g. has original ideas; answers its question). They can comment on their judgments.
- Rubric: Generates a numeric grade based on the level of achievement markers choose for each criterion. You’ll be able to define your criteria and, for each criterion, as many levels as you need. (If you need more levels, save the form, then when you edit it again, an extra level will be available.) The Rubric will display with a free text field for Overall Feedback. Do note that Rubric will generate a numeric grade and cannot be set to feedback-only – in other words, you will need to assign a single numeric grade to each level, and those marks must be unique. Note too that it is not currently possible to import or reuse rubrics created elsewhere.
Grade for Submission
This sets the maximum grade a user can attain from an instructor for a given submission. It is scaled between 0-100. If you have set up any Grade Categories, you will see a picklist.
Submission grade to pass
Here you can set a passing grade for the workshop submission. This may be connected with Activity completion and Conditional activities such that a user will not be able to access a follow-up activity until they have obtained the required grade.
Grade for Assessment
Sets the maximum grade a user can receive for assessing other users’ work. It is also scaled between 0-100. If you have set up any Grade Categories, you will see a picklist.
Assessment grade to pass
Here you can set a passing grade for the workshop assessment. This may be connected with Activity completion and Conditional activities such that a user will not be able to access a follow-up activity until they have obtained the required grade.
Submission settings
Instructions for submission
Users see this when they click on the link to the Workshop. Explain here what they need to do to make a successful submission (It may also help to refer them back to general instructions for using the Workshop – how to find out when the deadlines are and what they do at each stage).
If you wish users to attach files, select how many here, up to a maximum of 7. If you leave it at 0 then they can only enter text. You can also specify the maximum upload size of the files they upload – depending on the course limit.
You can also specify which types of file they are allowed to upload. (Ask your admin to check Server > File types if you want to include an uncommon file type.)
Late Submissions
Ticking this box will allow users to submit after the deadline. Any late submissions cannot be edited by the user – they just have one chance to submit.
If late submissions are allowed, you’ll need to regularly allocate submissions by clicking the link. You can allocate submissions manually or randomly.
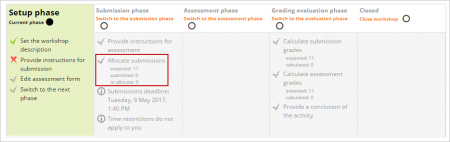
(Allocation settings are explained below – they will be made after these workshop settings have been saved by clicking the “Allocate Submissions” link highlighted with a red box in the picture of the dashboard. See the section Submission phase.)
Submission settings for allocating reviewers to submissions
Assessment settings
Instructions for assessment
Users see these instructions when the Workshop is in Assessment Phase. They are important to users’ understanding of the task before assessing their classmates’ submissions.
After these workshop settings have been saved, Instructors can access further settings related to allocating assessments. See the section Setup phase.
Use self-assessment
Checking this box means that users may be allocated their own work to assess. This will depend on LMS’s allocation i.e. the larger the group of users the less likely it is that anyone will be allocated their own work.
Feedback
Overall feedback mode
If this is enabled, a text box appears at the bottom of each assessment form for reviewers to give an overall comment about the submission. You can make this required or optional, and you can also specify the number of attachments and maximum upload size of these attached files, dependent on the course upload limit.
You can also specify which file types they are allowed to upload. (Ask your admin to check Server > File types if you want to include an uncommon file type.)
Conclusion
The text you add here will be shown to the users when the workshop is over. It is a good idea to signpost users to how they can access the assessments they have received. It might also include suggestions on what users should do next.
Example submissions
In some situations, it might be helpful to the users to see one or more examples of what they must submit. If you offer example submission, you can choose whether users are required to assess them or if it is optional. If they are required to assess the example submissions, then you can also decide whether they assess them before they submit their own work or afterward, but before peer assessing.
Note: Assessments of the example submission are not counted when calculating the grade for assessment.
Availability
This section deals with setting submission times and assessment times for the workshop. That is the time when users can start submitting as well as the deadline for submitting, and similarly the time assessments for other users’ work start and when they must finish assessing other users work.
All dates – open for submissions from, submissions deadline, open for assessment from an assessment deadline – are displayed in the course calendar.
Availability lets an instructor decide if they want a workshop with a closed schedule or one that is open-ended. Setting an opening time but leaving the deadline open makes it an ongoing activity. To set the opening time and deadline for either submissions or assessments instructors must click the enable button next to the option they want to set. Once the enabled has been checked the 5 drops down boxes will be activated and available for change.
The first three boxes correspond to the date and we can either set this box by box or by selecting the date in the calendar that pops up when any of the date boxes are selected.
The last two boxes correspond to the time in 24 hour time, the first of the two being hours and the second being minutes. Instructors simply set the desired time for each of the sections they wish to activate.
If instructors check the box “Switch to the next phase after the submissions deadline”, the workshop will automatically switch to the assessment phase after the next cron job.
Note that even if Switch to the next phase after the submissions deadline is enabled, an instructor will need to manually move the workshop into Submission Phase and click on Close to conclude the workshop and reveal the assessments.
Common module settings
Restrict access/Activity completion
These settings are visible if Restrict access and Activity completion have been enabled in the site and the course.
Click Save and Display to access further settings
Setup phase
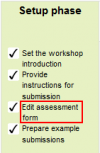 |
- You must now click ‘Edit assessment form’ to set the criteria users will need for when they do their peer assessments later on.
- Include an example submission if you want users to be able to see this form when they submit.
- You can choose from several grading strategies. See Workshop grading strategies for more information.
Submission phase
To decide how users will receive the submissions of their peers, click the ‘Allocate submissions’ link in the Submission phase section.
|
Manual Allocation options |
Random Allocation options |
Scheduled Allocation options |
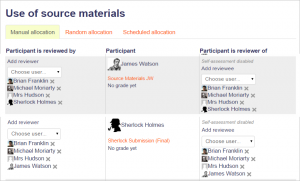
Manual Allocation
Here, an instructor can manually choose which users review whose work. A user can review work even if they have not submitted anything themselves.
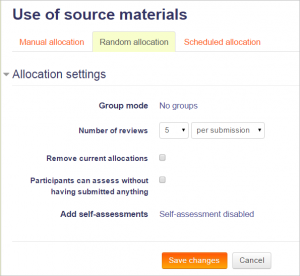
Random Allocation
The instructor is given 5 settings that determine how the random allocation will work.
- Number of reviews: Here the instructor picks between 0 and 30 reviews for either each submission or per reviewer. That is the instructor may choose to either set the number of reviews each submission must have or the number of reviews each user has to carry out
- Prevent reviews by peers from the same group: If the instructor wishes for users of the same group to never review each other’s work, as most likely it is their work too in a group submission, then they can check this box and lms will ensure that they are only allocated other users out of their group’s work to access
- Remove current allocations: Checking this box means that any manual allocations that have been set in the Manual Allocation menu will be removed
- Can access with no submission: Having this box checked allows users to assess other users’ work without having already submitted their own work.
- Add self-assessments: This options when checked to make sure that as well as assessing other users’ work they must also assess their own. This is a good option to teach users how to be objective towards their own work.
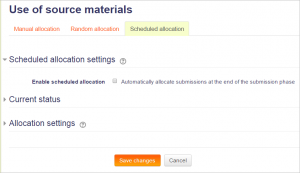
Scheduled Allocation
If you set the workshop to automatically switch to the Assessment phase once the deadline for submissions is over, then enabling Scheduled allocation means that LMS will automatically allocate (randomly) the submissions to be assessed. As with manual random allocation, you can specify the number of reviews, whether or not users need to have submitted something in order to be able to assess, and so on.
Assessment phase
- Examples:
Users can assess example submissions for practice before assessing their peers’ work if this feature is enabled. They can compare their assessments with reference assessments made by the instructor. The grade will not be counted in the grade for assessment.
Instructors need to upload one or more example submissions and the corresponding reference assessment to support this function.
Instructors can also edit the reference assessment later by clicking the ‘re-assess’ button in the first page.
- Peer assessment:
If this feature is enabled, a user will be allocated a certain amount of submissions from his peers to assess. He will receive a grade for each assessment, which will be added together with the grade for his own submission and this will be used as his final grade for this assignment.
This is the key feature of workshop: To encourage users to assess the work of their peers and learn from each other. Through this, they will see the strengths of their classmates’ submissions and have a better understanding of how to do a good job. In addition, the advice they get from their peers will give them a more comprehensive view of their own work: The comments from their peers will point out the weakness of their work, which is generally difficult to find out by themselves.
- Self-assessment:
If this option is turned on, a user may be allocated his own work to assess. The grade he receives from assessment of his own work will be counted into the grade for assessment, which will be added together with the grade for submission and used to calculate his final grade for this assignment.
This setting enables instructors to see whether users can find out the strength and weakness of their own submissions and judge them objectively. It is a good way to help users think more comprehensively.
Grading evaluation phase
Grading evaluation settings
|
Grading evaluation settings |
Here you can choose your settings for calculation of the grade for assessments.
Grade calculation method
This setting determines how to calculate grade for assessments. Currently, there is only one option- comparison with the best assessment.
The Comparison with the best assessment tries to imagine what a hypothetical absolutely fair assessment would look like.
For example, an instructor uses Number of errors as grading strategy to peer-assess one assignment. This strategy uses a couple of assertions and assessors just need to check if the given assertion is passed or failed. That is, they only need to choose ‘yes’ or ‘no’ for each criterion in the assessment form. In this case, there are three assessors, Alice, Bob, and Cindy. And the assessment form contains three criteria. The author will get 100% grade if all the criteria are passed, 75% if two criteria are passed, 25% if only one criterion is passed and 0% if the assessor gives ‘no’ for all three assertions. Here are the assessments they give to one certain work:
Alice: yes/yes/no
Bob: yes/yes/no
Cindy: no/yes/yes
Then the best assessment will be:
Yes/yes/no
Second, the workshop will give the best assessment 100% grade. Next, it will measure the ‘distance’ from other assessments to this best assessment. The farther the distance, the lower grade the assessment will receive. And Comparison of assessments setting, next to the Grade evaluation setting, will determine how quickly the grade falls down if the assessment differs from the best one.
Note: Comparison with the best assessment method will compare responses to each individual criterion instead of comparing the final grades. In the example above, all of the three assessors give 75% to the submission. However, only Alice and Bob will get 100% grade for their assessments, while Cindy will get a lower grade. Because Alice and Bob agree in individual responses too, while the responses in Cindy’s assessment are different.
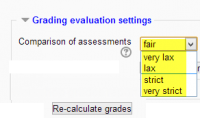
- Comparison of assessments:
This setting has 5 options: very lax, lax, fair, strict and very strict. It specifies how strict the comparison of assessment should be. By using a comparison with the best assessment method, all assessments will be compared with the best assessment picked up by workshop. The more similar one assessment is with the best assessment, the higher grade this assessment will get, and vice versa. This setting determines how quickly the grades fall down when the assessments differ from the best assessment.
Workshop toolbox
|
Workshop toolbox |

Clear all aggregated grades
Clicking this button will reset aggregated grades for submission and grades for assessment. Instructors can re-calculate these grades from scratch in Grade evaluation phase.
Clear assessments
By clicking this button, grades for assessments along with grades for submission will be reset. The assessment form will remain the same but all the reviewers need to open the assessment form again and re-save it to get the given grades calculated again.
Site administration settings
The workshop module has additional settings which may be changed by an administrator in Administration > Site administration > Plugins > Activity modules > Workshop. The settings enable default values to be set for all edit workshop settings.