Contents
1 Setting the authentication method(s)
2 Authentication common settings
2.3 Allow accounts with same email
2.4 Prevent account creation when authenticating
2.9 ‘Is this your first time here?’ instructions
2.10 Allowed and denied email domains
Setting the authentication method(s)
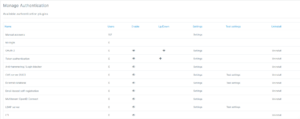
An administrator can set up the site’s authentication methods by following these steps:
- Go to Setting > Plugins > Authentication > Manage authentication
- Click the eye icon to enable selected authentication plugins (closed eye = disabled, open eye = enabled)
- Click the settings link opposite the authentication plugin(s) you have chosen
- Configure the required settings and click the “Save changes” button
- Repeat until you have edited all the plugins you have enabled
You can enable more than one authentication method at the same time. LMS will check each plugin in order to find a matching username and password. When a match is found, the user is logged in and the other plugins are skipped.
For best performance, move the plugin used by most users to the top of the list.
Authentication common settings
Authentication common settings can be changed by an administrator in Settings > Plugins > Authentication > Manage authentication.
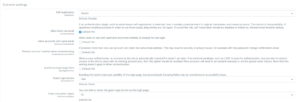
Self registration
If you want users to create their own accounts, choose Email-based self-registration (or another plugin that supports self-registration, such as LDAP) from the drop-down menu. When this is enabled, the login page will show a “Is this your first time here?” message and a “Create new account” button.
Note: The Email-based self-registration authentication plugin must be enabled if users have previously created their accounts using this method. Choosing it as the self-registration option allows new users to sign up on their own.
Be aware that self-registration can lead to spam accounts. To reduce this, see the section “How can I prevent spam accounts if I use self-registration?” in the Authentication FAQ.
If self-registration is enabled, you can also turn on Digital age of consent verification. For more information, See Privacy for further details.
Allow login via email
When enabled, users can sign in with their email or username.
Allow accounts with same email
By default, usernames must all be unique. If this setting is set to yes, it allows users to be created by an admin or uploaded that have the same email address as another account. (It does NOT allow users to sign up for an account with an email address which is the same as another account.)
Note:
Using the same email address for multiple accounts can cause confusion. Password reset messages will go to the same email inbox, meaning anyone who can access that email could access the other accounts. Users may also not know which account a message belongs to.
If possible, encourage users to use email aliases (for example, Gmail’s “+alias” feature) so each account can receive distinct emails.
Prevent account creation when authenticating
If you are using an external database like LDAP, LMS will normally create a new account the first time a user logs in. Turn this setting off if you do not want new accounts to be created automatically and only want existing users to access the site.
You can choose to show or hide the guest login button on the login page. If you hide it, guests cannot access the LMS site. However, users who are already logged in can still enter courses that allow guest access without needing to enroll.
Limit concurrent logins
By default, users can be logged in from any number of browsers at the same time. (They can check their active sessions on the Browser sessions page.) This setting lets you set a maximum number of simultaneous browser logins. When the limit is reached, the oldest session will automatically be logged out.
Note: This feature does not work with Single Sign-On (SSO) plugins.
Alternate login URL
Use this setting carefully. If the URL is incorrect or the custom login page has an error, you may be locked out of your site.
If this happens, you can fix it by removing the alternateloginurl entry from the mdl_config table in your database (for example, using phpMyAdmin for MySQL). Depending on your setup, you may also need to clear the site caches by running:php admin/cli/purge_caches.php
Forgotten password URL
If password recovery is handled entirely outside the LMS (for example, by a help desk), you can enter the URL of that service here. Users who click the “Lost password” link in LMS will be redirected to this URL.
Note: Enabling this will disable all of LMS ’s built-in password recovery options, regardless of the authentication methods in use.
‘Is this your first time here?’ instructions
The Instructions field allows you to display custom login guidance on the login page. If you leave it blank, the default instructions will be shown.
Note: These instructions apply only to certain authentication methods, such as Manual and Self-registration, and are not shown for most external methods like LDAP.
Multiple languages Custom instructions in more than one language may be provided as follows:
- Go to Settings > Site administration > Language > Language customisation
- Select a language then click the button ‘Open language pack for editing’ then click continue
- Select lms.php and enter loginsteps as string identifier then click ‘Show strings’
- Enter your custom login instructions in the local customisation text box
- Click the button ‘Save changes to the language pack’ then click continue
- Repeat the steps for other languages
Custom login instructions in English can be provided by editing the English language pack.
Allowed and denied email domains
When using Email-based self-registration you can restrict registration to specific email domains. For example, you might allow only users with a university email address to create an account.
Restrict domains when changing email
You can choose to enforce these domain restrictions only during account creation. This means that after creating an account, users may be allowed to change their email to a different domain if desired.
ReCAPTCHA
A CAPTCHA is a tool used to determine whether a user is human or a computer. Websites use CAPTCHAs to prevent bots or automated programs from generating spam. Since computers cannot easily read distorted text like humans can, CAPTCHAs block automated access.
In LMS, a CAPTCHA can be added to the Email-based self-registration form as a challenge-response test to reduce spam account creation.
To use reCAPTCHA:
-
Obtain reCAPTCHA keys by signing up at Google reCAPTCHA and registering your domain (free).
-
Copy the site key and secret key into the recaptchapublickey and recaptchaprivatekey fields in the Manage authentication > Common settings page (Site administration > Plugins > Authentication > Manage authentication) and save the changes.
Additionally:
-
Ensure Email-based self-registration is selected as the self-registration plugin in the common settings.
-
Enable the reCAPTCHA element in the Email-based self-registration settings.
Profile fields data mapping and locking
Most authentication plugins that use an external source for user accounts (such as LDAP) can retrieve some user profile details, like first name, last name, and email. Using the Data Mapping section in the plugin’s settings, you can control what information is imported, how it is managed, and when it is updated.
These fields are optional. You can pre-fill LMS user profile fields with data from the external authentication source. If a field is left blank, LMS defaults will be used instead. In either case, users can edit their profile fields after logging in, unless the fields are locked.
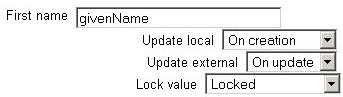
You can also control how the fields are updated and whether users can modify them:
- Update local: Controls when LMS updates the user field from the external source:
- On creation: The field is updated only when the user first logs in and their account is created.
- On every login: The field is updated each time the user logs in or during synchronization (for plugins that support it). Fields updated locally are usually locked
- Update external: Controls when the external source is updated from LMS:
- Never: The external source is never updated.
- On update: The external source is updated whenever the user profile is updated. Fields must be unlocked to allow edits.
- Lock value: Controls whether users can edit a field:
- Unlocked: Users can edit the field anytime.
- Unlocked if empty: Users can fill in the field if it is empty; once filled, it becomes locked.
- Locked: Users cannot edit the field at all.
If your site uses multiple authentication types (for example, IMAP and Manual), the data mapping and field locking are specific to each plugin. Each plugin manages its own mapped and locked fields.
Tip: Always test field locking with the correct type of account. Testing with the wrong account type (e.g., manual instead of IMAP) may not show if the locking works correctly.