The Guest access plugin allows users with the Guest role to view the contents of a course. This might be used, for example, if an LMS site serves as a website where certain courses contain publicly available information, or else with a commercial LMS site where courses with guest access can offer a “taster” of the kind of courses which may be purchased. (Note that the guest cannot participate in any activities; they can only view content.)
Contents
1 Course settings for guest access
2 Admin settings for guest access
2.1 Default settings for guest access
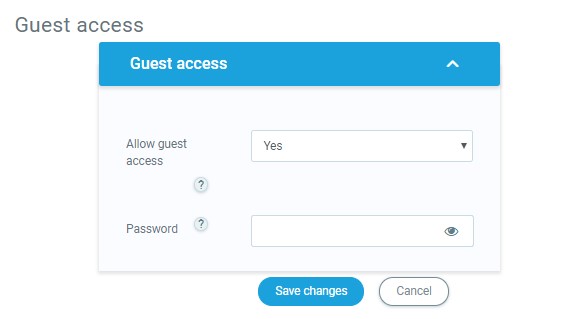
Course settings for guest access
- From the navigation drawer on the left, click ‘Participants’, and then from the gear menu on the right, click ‘Enrollment method> Guest access’. With other themes, click Administration > Course administration > Users > Enrollment methods and then Guest access.
- Enable guest access by clicking on the “eye” icon or by choosing it in the ‘Add method’ drop-down menu.
- If you wish to set a password, then click the configure icon and type in your password here.
Setting password from Enrollment methods page
Admin settings for guest access
- In Settings > Plugins > Enrollments > Manage enroll plugins, ensure Guest access is enabled (has its eye open.) This enables Guest access.
- In Settings > Plugins > Authentication > Manage authentication set the Guest login button to Show if you want the button on the Frontpage.
- Also Guest accounts can be logged – check the Settings > Server > Cleanup > Log guest access setting
- A site policy for guests may be set in Settings > Site administration > Security > Site policies. Guests then have to agree to the site policy before accessing a course with guest access.
Default settings for guest access
- Clicking on Settings > Plugins > Enrollments > Guest access brings up the screen where admin can set defaults for guest access in courses.
- Clicking the ‘Advanced’ button next to ‘Allow guest access’ will hide this setting in a course and will instead display a ‘Show more’ link to click on to access the setting.
- Guest access can be turned on by default in all new courses and you can also:
- require each course with guest access to have a password for guests. (Note: this can confuse instructors who are not aware of the requirement.)
- use or ignore your LMS’s standard password policy for guest access passwords
- offer if needed the first letter of the password as a hint.
Auto-login guests
- In Settings > Users > Permissions > User policies, you can tick the box so that visitors are automatically logged in as guests when accessing a course with guest access (i.e. they don’t have to click the “login as guest” button.
- In Settings > Plugins > Authentication > Manage Authentication, you must have “Guest login button” set to “Show”.
- In Settings > Security > Site policies you can check “Open to Google” setting so that the Google search robot will be allowed to enter your site as a Guest. In addition, people coming into your site via a Google search will automatically be logged in as a Guest.