The PayPal enrollment plugin allows users to pay for courses and then be automatically enrolled.
PayPal side setup
- Create a PayPal account at https://www.paypal.com
- Although not required, it may be wise to upgrade your account to “Premier” status and get “Verified”.
- Set the encoding to UFT-8.
- Go to Profile > Profile and settings > My selling tools > More selling tools > PayPal button language encoding
- Make sure you have your website’s language set to Western European Languages
- Click the “More Options” button
- Set encoding to “UTF-8” and let the same encoding be used for IPN, too.
- Enable instant payment notifications (IPN)
- Go to Profile > Profile and settings > My selling tools > Getting paid and managing my risk > Instant payment notifications > Update
- Turn IPN on and set the notification URL to your site’s enroll/paypal/ipn.php (so it reads for example like https://my.school.edu/lms/enroll/paypal/ipn.php).
You may wish to log in to https://developer.paypal.com/developer/accounts/ and experiment with PayPal Sandbox first. If doing so, put this to your config.php:
$CFG->usepaypalsandbox = 1;
Enabling PayPal enrollment
An administrator can enable PayPal file enrollment as follows:
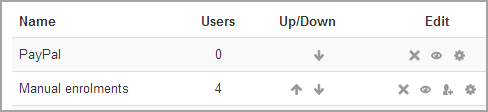
- Go to Site administration > Plugins > Enrollments > Manage enroll plugins and click the eye icon opposite PayPal. When enabled, it will no longer be greyed out. Manual enrollment must also be enabled since the PayPal plugin requires it.
- Click the settings link, configure as required (see details of settings below), then click the ‘Save changes’ button.
- PayPal business email – This setting is case sensitive and must exactly match that in PayPal
- Default role assignment – This means the role that a new user will automatically be given in a course when they purchase access. Usually, this would be “student” unless you have a special reason for choosing another role. As for other default settings, it may be overridden in individual courses.
Tip: If you wish to allow users to create their own accounts on your site then you need to set up Email based self registration.
Course settings for PayPal
Checking you have PayPal in your course
- Click the gear menu from the Participants link and then click Enrollment methods. If you are using a different theme, go to Course administration > Users > Enrollment methods
- If you do not see PayPal, use the pull-down menu “Add method” and select PayPal
- Make sure PayPal has its “eye” opened:
| Note: Make sure you don’t have Self-enrollment enabled as this would allow users to access the course without paying. If you do need some users to self-enroll for free, then add an Enrollment key in the self-enrollment settings. |
Setting a price for your course
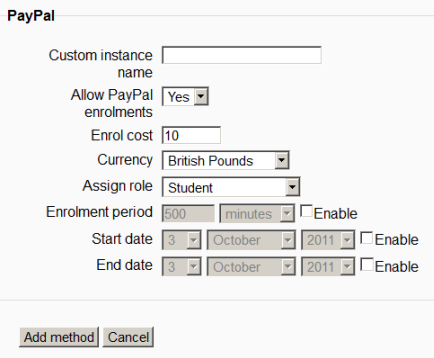
- In Course Administration > Users > Enrollment methods, click the edit/hand/pen icon to the right of the PayPal option.
- Optional: Give a name to this enrollment method if you wish in “Custom Instance name”
- Ensure that “Allow PayPal enrollments” is set to “yes”
- In “Enrol cost”, type in the cost of your course and in “Currency” choose your currency.
- Usually you would leave the “Assign role” as “student” unless you have a very special reason for allowing your users to enroll as, say, editing instructors etc
- Choose an enrollment period and/or start/end dates if desired.
- Click the “Save changes” button.
What the new user sees
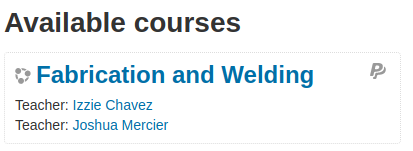
When a new user clicks on your course link, they will see a message inviting them to go to PayPal to purchase access to the course. In the list of courses, PayPal courses have a “P” icon next to them.
|
Message inviting user to pay via PayPal
|
PayPal course listed with “P” icon
|