Contents
3.7 Access the template guides
3.10 Add / Edit / Delete guides
Introduction
- This block displays guides for external instructors/graders.
- These guides are created by instructors and are based on templates created by administrators.
- The template creation system allows the generation of LMS forms containing text area, file uploader, and links.
Sometimes an institution uses an LMS site to run exams and they contract external instructors to grade the students. To help the external instructors conform with the institution grading rules, the institution provides the external instructors’ access to a course guide on how to grade. The Moderator Guide block allows the creation of guides for external instructors.
It is the responsibility of each main course instructor to create a course guide for the external instructors. However, the main instructor cannot create his own “free style” guide, he needs to follow a template created by the LMS administrator. The block template creator allows administrators to create templates using placeholders for the text area, file manager and links (a placeholder is like a WordPress shortcode).
On another hand, a LMS site is sometimes used to manage multiple educational organizations. The Moderator Guide block allows administrators to restrict access to the templates and guides as needed.
LMS Administrator
The administrator role is to install the block, set up the block in LMS and provide the instructors with guide templates.
Download
From the LMS plugins database.
Block setup
The goal of this block is to be displayed on all course main pages.
In order to achieve this result, you need to add the block on the LMS front page. Edit the block and select display this block through the entire site. Then go to a course page, edit the block and select display on course main pages only. You can also change the name of the block in the same page.
Create a template
The instructors cannot create a guide if you don’t provide them with a guide template.
Go to Site Administration > Plugins > Blocks > Moderator Guide > Manage templates
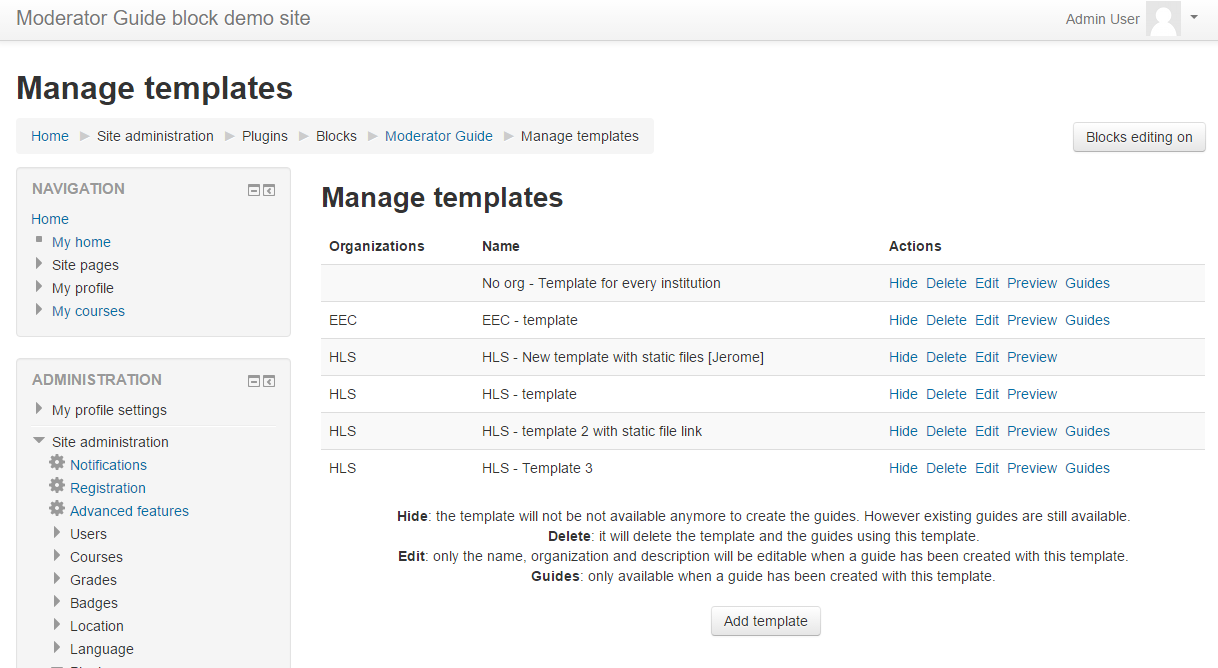
Click on Add template
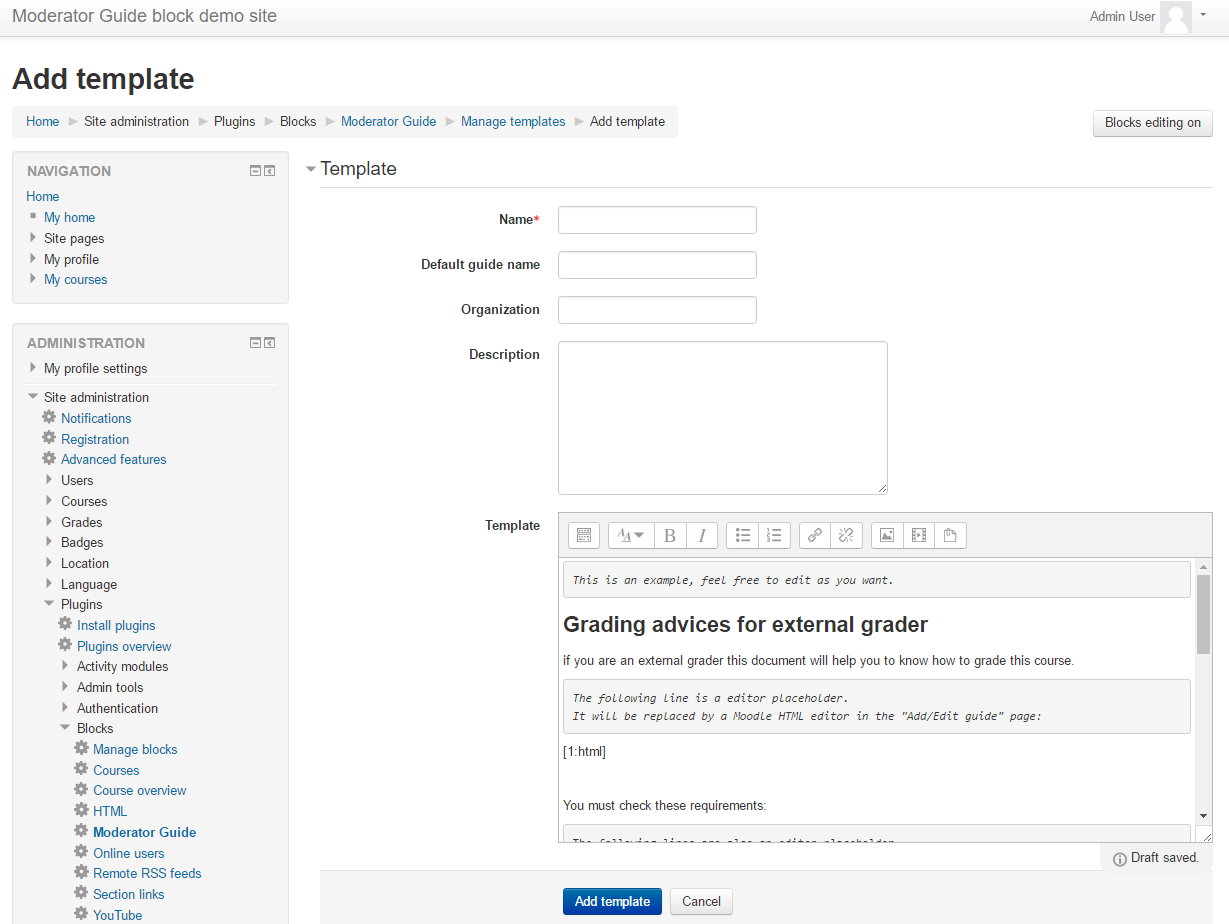
Enter the following:
- template name: when creating a guide, the instructor must select a template so you need to give it a name)
- default guide name: it will prefill the Guide name when an instructor creates a guide. The instructor still can change the guide name
- organization: you can restrict the visibility of a template (and the guide based on this template) per organisation. See the section about organization
- description: some notes about the template, only seen by other administrator when they edit a template
- template: this is the guide template. All text and images you enter will be displayed in the guide created by the instructors. The instructors won’t be able to edit the text and image you enter this way. To allow teachers to enter text and image when they create a guide, you must type an editor placeholder
Placeholder types
The templates allow you to enter placeholders. When the guide creation form is display to an instructor, these placeholders are replaced by respective form elements (input text, input link, input files).
- [X:files] : the instructor will be asked to add files in a LMS file manager.
- [X:html] : the instructor will be asked to enter text and images in the LMS HTML editor.
- [X:html:BEGIN] some default HTML [X:html:END] : the instructor will be asked to enter text and images in the LMS HTML editor. You can pre-fill this editor with some default text and images.
- [X:link] : the instructor will be asked to enter a web page link.
In the placeholder syntax, X must be an integer and it should be unique for each placeholder (apart from [X:html:BEGIN] and [X:html:END] which share the same X value.). X is an identifier used internally by the code – it has no use for you but it is required otherwise the block will not properly display the guides.
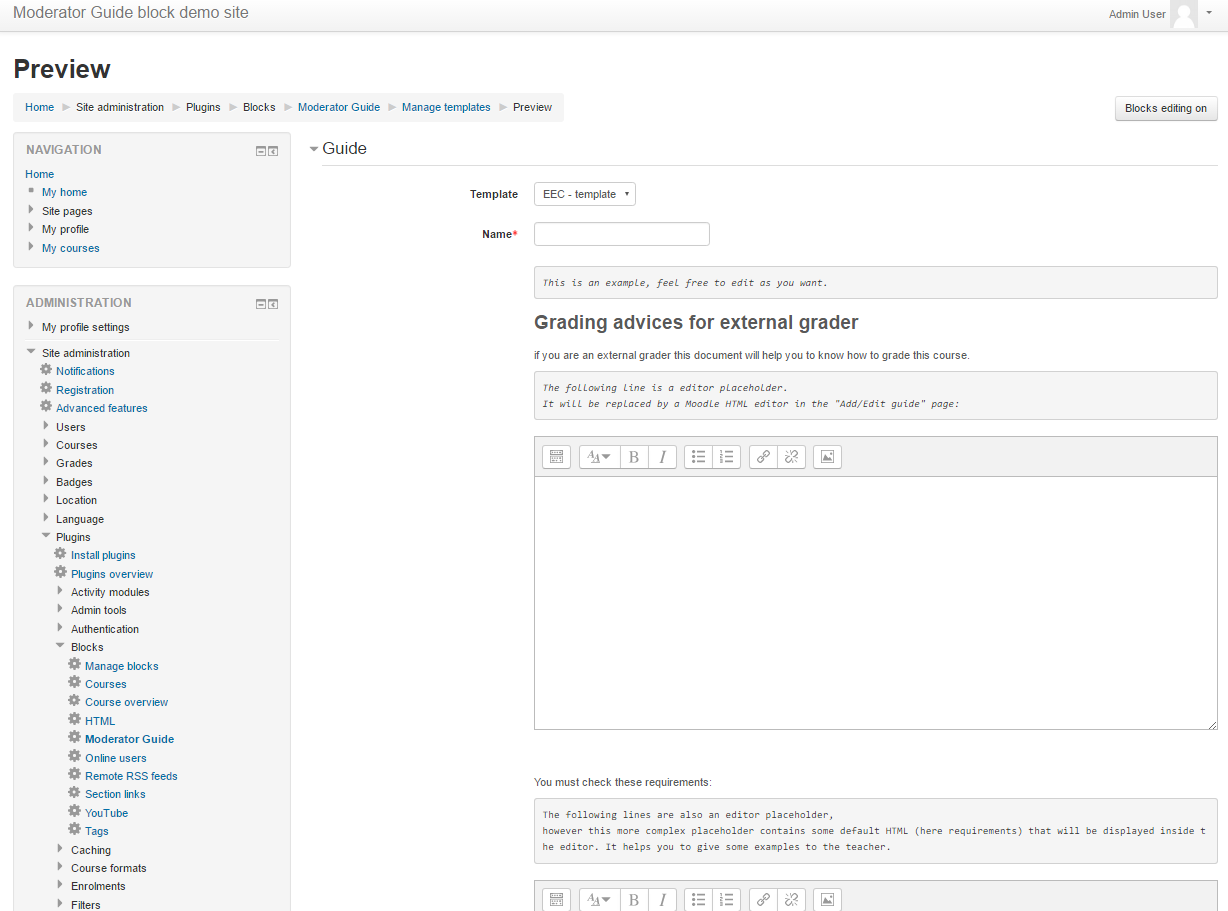
Preview a template
Once a template has been created you can preview the guide creation page when the instructor selects this template. Click on the Preview link.
Hide / Show a template
When a template is hidden no instructor can create a new guide using this template. However, hidden a template has no impact on the visibility of guides based on this template (guide visibility can be changed in the Manage guides pages). When a template is shown then instructors can use it to create new guides. Click on Hide / Show in the Manage templates page.
Access the template guides
If guides have been created using a template, you can access all guides of this template clicking on the respective Guides link.
Edit a template
Editing a template is similar to adding a template. Note that if at least one guide has been created using a template then you can not edit the template field (but you can still edit the name, default name, description and organization). Click on Edit in the Manage templates page.
Delete a template
You can delete a template. If you do it, then all guides created with this template will be deleted too. Click on Delete in the Manage templates page.
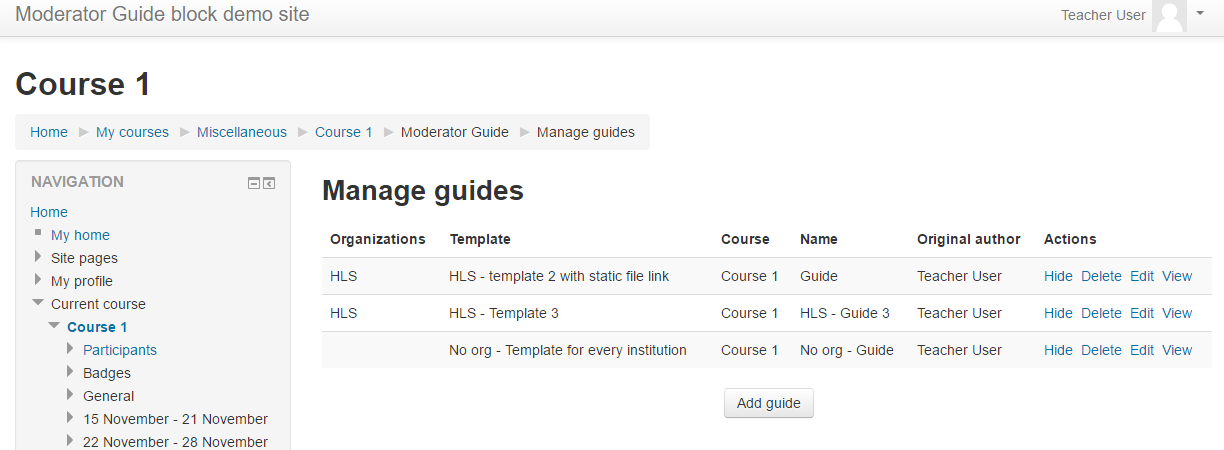
Add / Edit / Delete guides
Managing guides as an administrator is similar to managing guides as an instructor. Go to the instructor section for more information.
Restricting access per organization
If your LMS site is used to manage multiple organizations it is possible to restrict access to template and guides to a specific organization.
- Create a new user profile field (see the LMSdocs documentation on how to create a profile fields). For our example, call the profile field shortname “faculty”
- Set the “faculty” profile field to the users you want to restrict the access (For example it could be “Faculty of Science”)
- Go to Site Administration > Plugins > Blocks > Moderator Guide
- Type “faculty” is the organization field (it must be a profile field shortname).
- Go to Site Administration > Plugins > Blocks > Moderator Guide > Manage templates
- Edit all templates you want to restrict to one specific faculty. In the organisation, field enter the faculty (for example “Faculty of Science”)
From this point, you have restricted access per organization.
It has the following impact:
- when the instructor profile field is empty (i.e. the instructor “Faculty” profile field is empty), the instructor can create guides based on any templates.
- when the external instructor profile field is empty , the external instructor can see any guide.
- when a template has no organization, all instructors can create a guide based on this template and the guide can be viewed by external instructors.
- when the template organization matches the instructor profile field (i.e. the instructor “Faculty” profile field is equal to “Faculty of Science”), the instructor can create guides based on this specific template.
- when the template organization matches the external instructor profile field, the external instructor can see the guide based on this specific template.
- in all other cases, the instructors cannot create a guide and the guides can not be viewed by external instructors.
Instructors
As an Instructor, your role is to create a Guide for the external teachers.
Create a guide
Go to a course.
In the Moderator Guide block, click on Manage guides.
Click on Add guide.
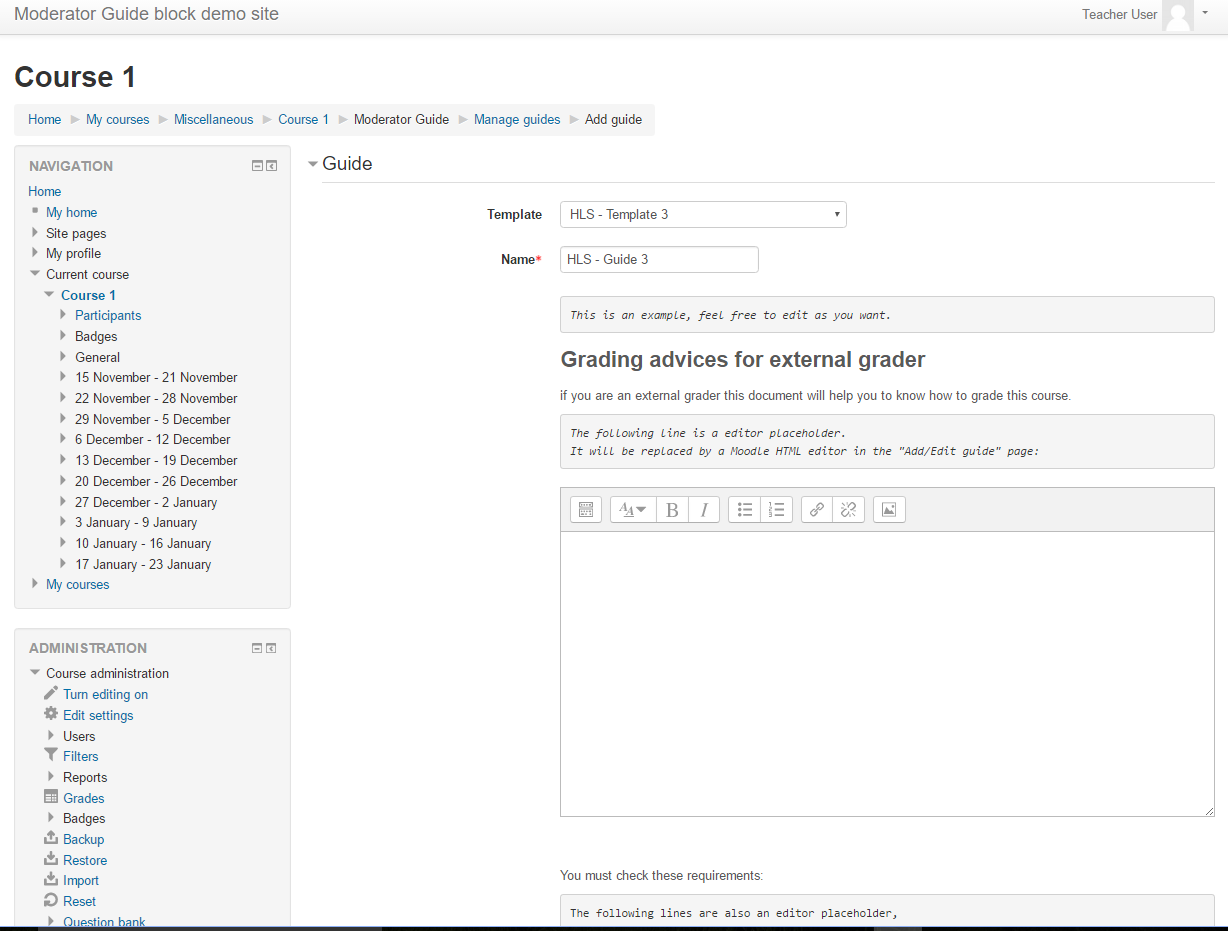
On this page, you first must select a guide Template. Guide template are preformatted guide forms. They contains hard coded text and images you are not allowed to modified (often it would be the header and footer of the guide which your institutions may want to keep control of). They usually also contains at least one input field for you to enter your own text and images. Sometimes you can even upload files or enter links.
Once you selected your guide template, enter a Name. Sometimes a field would have been prefilled to help you following a good naming convention.
Finally, you can create your guide content filling the text editor with text and images, uploading files in the file managers and creating a link. These inputs will changed depending on the template you selected.
Update a guide
You can update a guide at any time. Click on Edit in the Manage guides page.
Delete a guide
You can delete a guide at any time. Click on Delete in the Manage guides page.
Hide / Show a guide
You can decide to hide a guide to the external instructors. Click on Hide / Show in the Manage guides page. On creation, all guides are hidden. This is useful to keep you working on your guide before showing it. Hide / Show is the equivalent of Unpublish / Publish in WordPress.
External instructors
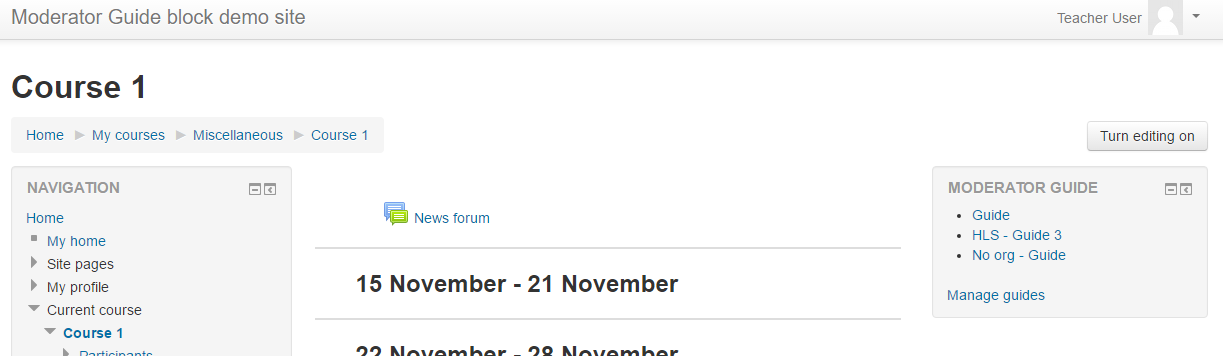
As an external instructor, your role is to read the guides to help you grading the students. On each main course page, you should see a “Moderator Guide” block providing you with one or multiple grading guides to follow.
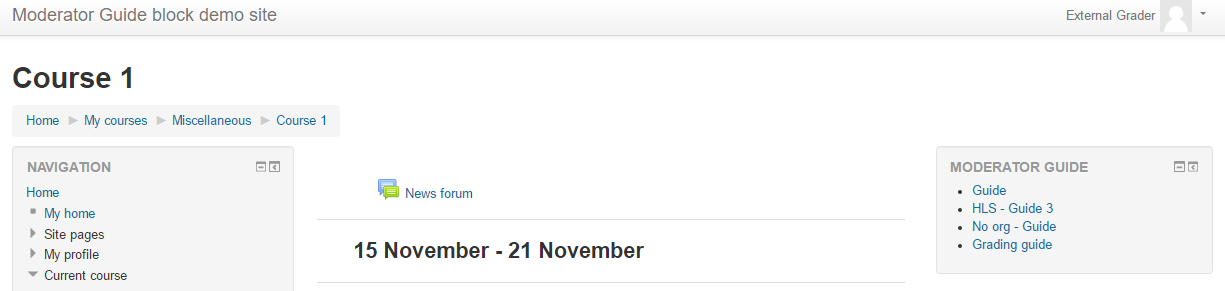
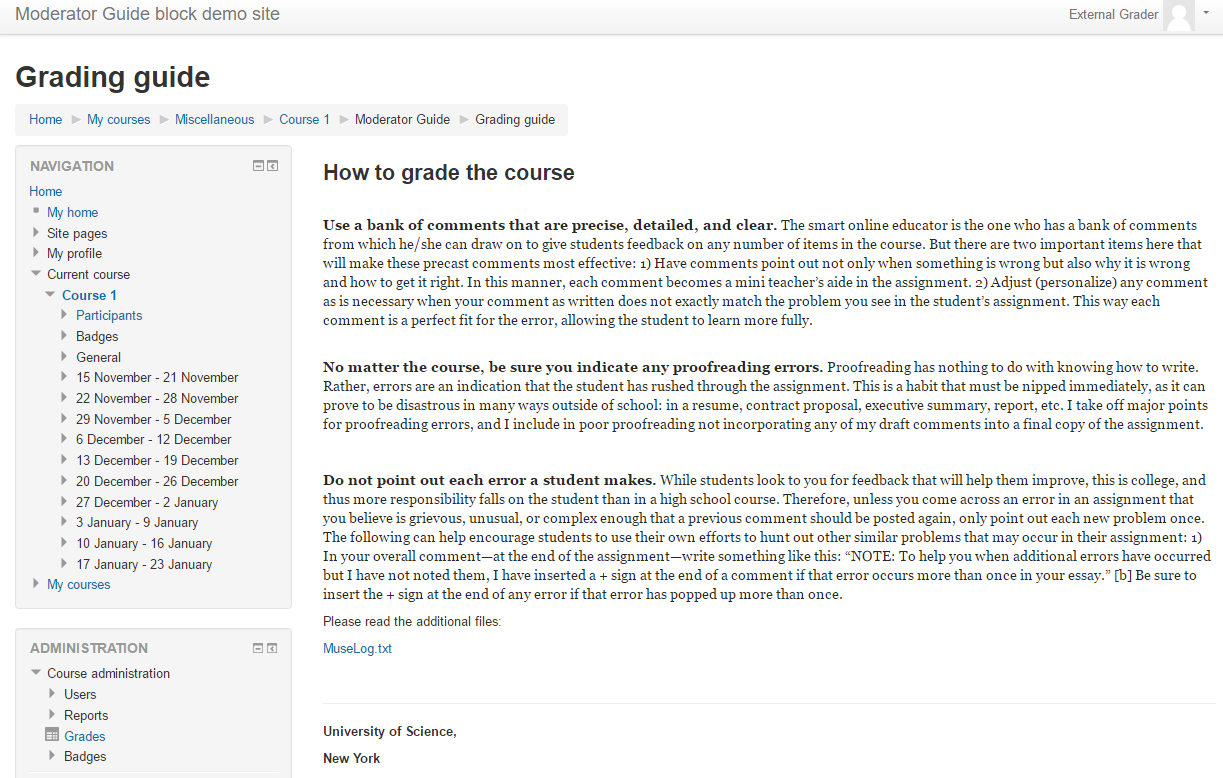
Click on a Guide to view it. Guides may contain text, images, links and files to download.
Students
Students are not allowed to use this plugin.
License
Coventry University
This program is free software: you can redistribute it and/or modify it under the terms of the GNU General Public License as published by the Free Software Foundation, either version 3 of the License, or (at your option) any later version.
This program is distributed in the hope that it will be useful, but WITHOUT ANY WARRANTY; without even the implied warranty of MERCHANTABILITY or FITNESS FOR A PARTICULAR PURPOSE. See the GNU General Public License for more details. You should have received a copy of the GNU General Public License along with this program.