The Keyholder role may be given to an organization member so that they may provide the course enrollment key to users when self-enrolling. The keyholder does not have to be the course instructor.
Creating the Keyholder role
- As an administrator, go to Site administration > Users > Permissions > Define roles and click the ‘Add a new role’ button at the bottom of the screen.
- On the next screen, select ‘No role’ for ‘Use role or archetype’ and click to continue.
- Give the role a name, and if desired a description, and tick the “Course” context if you want your keyholder to be able to manage keys in a course, or the “Category” context if you want them only to manage keys in a category.
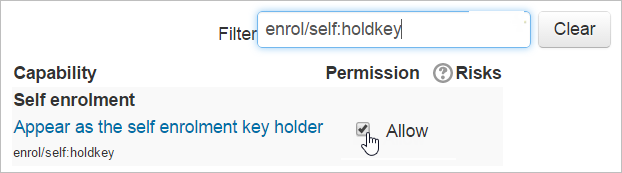
- In the filter, type ‘enroll/self:holdkey’ to display this capability and set it to ‘Allow’.
- Click ‘Create this role’.
Assigning a user the role of Keyholder
To assign the role in a course, enroll the relevant user from Course administration > Users > Enrolled users.
To assign the role in a category:
- As an administrator, go to the category index page where you wish to assign this role – for example YOURLMSSITE/course/index.php?categoryid=1
- In the Category, administration block click Assign roles and assign the required users.
Making the keyholder appear on the enrollment page
- Go to Site administration > Appearance > Courses and tick the Keyholder role in ‘Course contacts’.
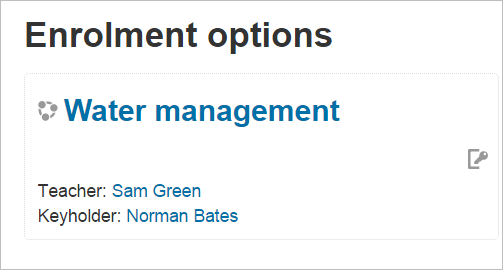
The keyholder will appear now along with any instructors when the user tries to self-enroll, and their name will be linked so users may contact them if they need the key:
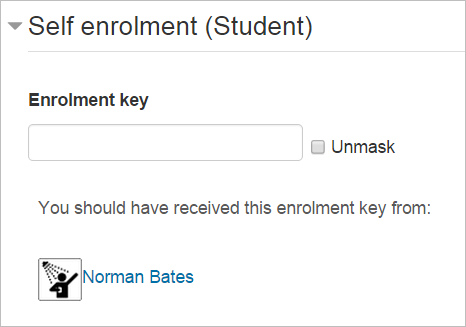
Whether or not the keyholder has been added as a course contact, their name will also appear as the person from whom the user should have received the key: