UPDATE: Support for the tools discussed below has been dropped with the advent of MathJax as a core tool that can be used in Atto.
NOTE: The tools discussed in these pages are, at this time, considered to be “third-party plugins”. They are not core, as yet, and still need to be thoroughly tested under more stringent conditions i.e. by users of all sorts. If interested, please follow the links below and download the package that suits your situation and uses it in good faith. Be aware that these tools may also undergo major changes as they develop and may be required to do so before they are included as the core. Check back here as often as you feel is necessary – updates will be included here when possible
Contents
Introduction
In August of 2011, the Maths integration package was released, named SEE, Super Equation Editor. Successfully integrated a number of Maths tools into previous LMS versions. These tools include Geogebra, JSXGraph, Math, MathML, MathTran, tex, DragMath, Geonext, JSQuery, MathJax. It was also included a version of TinyMCE that has, as native, a Maths editing toolbar. The pages that follow are a guide to downloading, installing and using the plugins.
|
Tip: It is highly recommended that trialing these tools is best done on a test LMS, not a production site. Once familiar and happy that there is not going to be too many issues in using them on a production site, they can then be tested more thoroughly by your Site Users. |
- ASSUMPTIONS: Your LMS is using a script-to-image converter to render TeX. You have activated and configured the TeX notation filter and have ensured the Algebra Filter has been activated. (As a test, you may want to edit some TeX and check that it renders properly.)
filter
In the filter folder, there are six sub-folders, each of which can be copied to the lms/filter folder of your installation. These sub-folders are GeoGebra, jsxgraph, math, MathML, Matheran, and tex.
lib
In the lib folder there are also six sub-folders for MplugB, and seven sub-folders for MplugA. Both have sub-folders called common, dragmath, editor, geonext, jsquery, jsxgraph. The MplugA also contains the additional sub-folder of MathJax.
The editor sub-folder contains the tinymath sub-subfolder.
All these sub-folders can be copied to the lms/lib folder, and if the default HTMLArea and TinyMCE editors are required to be retained, then the TinyMath editor sub-folder can be added to the lms/lib/editor folder. You may decide to remove the original editors and replace them with the TinyMaths editor. If so, the lms/lib/editor folder can be deleted and replaced with the plugin’s editor folder. However, this is not a recommended practice. What is used in case of a backstop being required? The Admins can deactivate the defaults and activate the TinyMath editor, retaining the original default editor as an emergency backstop.
theme
LMS themes are included with both packages. One is Mathstandard and the other is called Stylist. These can be unzipped and pasted to the lms/theme folder and can be used if needed. Like all themes, they may not be to prevailing or local cultural tastes, but they can be modified to suit each LMS site’s requirements.
Configuration
Log into the LMS and it should open into the Site Administration > Notifications page. Usually, when there has been an addition, LMS will automagically include everything as part of its installed files listing and open the Site Administration > Notifications page. If it does not, then go to the Notifications page and it should automatically bring up what it is changing and updating.
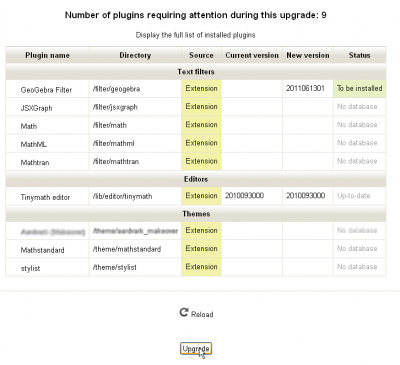
The Notification screen
Click the Upgrade button and it should run through it smoothly, taking you back to the Notifications page, which should now contain a minimal amount of information.
From there individual components need to be configured.
filter
The installer will continue with the configuration of the Geogebra package.

The Geogebra filter installer screen
followed by the configuration screen

The Geogebra filter configuration screen
Initially, it is recommended that the default settings be adopted. Having said that, perhaps the workspace is a bit small for a particular environment though, it can be changed either at this point or later when it suits the Users. If Geogebra is already being used and there is a familiarity with the tool, check the defaults against the full installation, otherwise, it is better to leave it until a better understanding of the tools is gained.
There is more configuration required, but we need to leave the Filters and return to the Administration menu. Scroll to the bottom of the page and click the Save button.
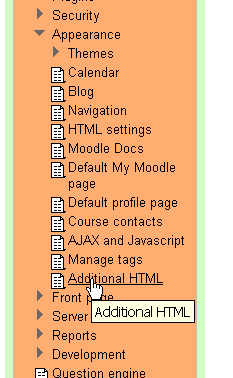
Additional HTML
Go to Site Administration > Appearance and you will see a new line:
|
A new item on the menu |
| Click this and enter the Additional HTML configuration page. |
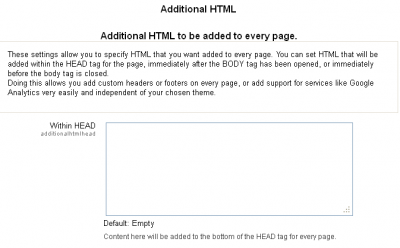
|
The Additional HTML editing page |
|
The Additional HTML editing page with edit |
| The Additional HTML editing page is a simple and straightforward editing page. it allows you to add some additional HTML into your pages that you may feel is necessary to be consistently present right across your site. Things like logos and such are adequately catered for in themes, but there are other things that you may feel are not. Make careful consideration before you add much beyond what is required here to get the Maths tools working.
This is not an opportunity to include additional styling commands, that is taken care of in the CSS files of your theme. |
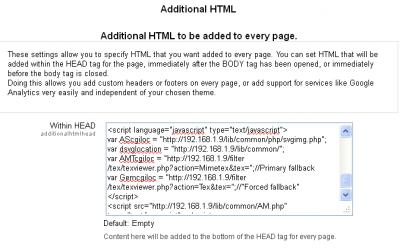
The recommended script, originally written by Mauno (change the IP address to suit your server):
<link rel=’stylesheet’ type=’text/css’ href=’http://111.121.101.131/lib/jsxgraph/distrib/jsxgraph.css’ media=’screen’ /> <script type=’text/javascript’ src=’http://111.121.101.131/lib/jsxgraph/distrib/jsxgraphcore.js’></script> <script type=’text/javascript’ src=’http://111.121.101.131/lib/jsxgraph/distrib/GeonextReader.js’></script> <script type=”text/javascript” src=”http://111.121.101.131/lib/MathJax/MathJax.js”> MathJax.Hub.Config({ config: [“MMLorHTML.js”],
extensions: [“tex2jax.js”,”mml2jax.js”,”MathMenu.js”,”MathZoom.js”], tex2jax: {displayMath: [[‘@d’,’@d’]], inlineMath: [[‘@i’,’@i’]] }, TeX: { extensions: [“AMSmath.js”,”AMSsymbols.js”,”noErrors.js”,”noUndefined.js”] } }); </script> <script language=”javascript” type=”text/javascript”> var AScgiloc = “http://111.121.101.131/lib/common/php/svgimg.php”; var dsvglocation = “http://111.121.101.131/lib/common/”; var AMTcgiloc = “http://111.121.101.131/filter/tex/texviewer.php?action=Mimetex&tex=”;//Primary fallback var Gemcgiloc = “http://111.121.101.131/filter/tex/texviewer.php?action=Tex&tex=”;//”Forced fallback” </script> <script src=”http://111.121.101.131/lib/common/AM.php” type=”text/javascript”></script>
This is a sample of additional HTML that can be added to the head of a document.
Closer examination of the script above reveals that it establishes the links required to the various packages that are used by the TinyMaths editor, which is configured soon. It adds no CSS but does create the command sequences required to correct for errors in the rendering of the TeX statements derived from the various packages. The characters and TeX macros available are loaded automatically. Some TeX macros are included in one package by default, but not another, e.g. the, therefore, (  ), the macro does not appear to be included in the DragMath package but is in the MathJax.
Setting the Accessibility Options
You can then go to the Plugins > Filters > Manage Filters menu and click to go to the Manage Filters page.
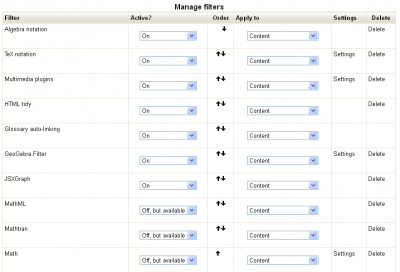
Setting the accessibility options
In this image, the options have been partly set, the User requires Geogebra, JSXGraph, and MathJax. There will be more configuring later, but for now, the TinyMath Editor needs to be activated.
lib
The first thing that needs be done here is to set the TinyMaths Editor as the default.
theme
The themes included with this plugin are configured and used in exactly the same way as any theme.
Adding the Tinymath Editor
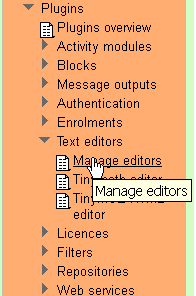
Installing the Tinymath Editor is not enough, on it own, you have to activate it. Go to the Plugins > Editors > Manage Editors screen.
When there you should see something like this:
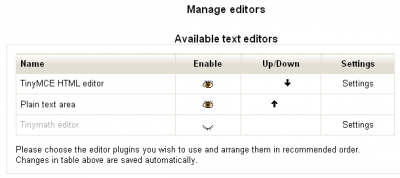
Setting the default editor
To activate the Tinymath editor, simply click on the closed eye.
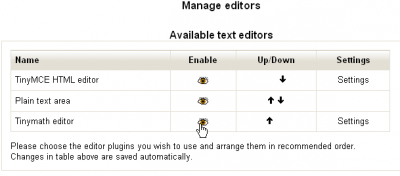
Activating the Tinymath editor
To then make it the default editor, use the promotion arrows to place it first in the list.
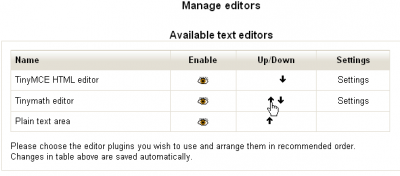
Setting the default editor
Tinymath should now be the default editor. To check this, go into a course and open it for editing and add a Resource. When you click on “Page” for example, you should get the Tinymath editor displaying. It looks something like:
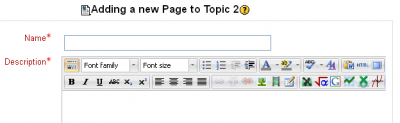
Tinymath – the editing toolbar
This essentially finishes the major installation tasks, there may now be some additional configuring that you may want to do, and some of that will be explained in related Docs.